Draw a Virtual Room Workshop
Best for ages 8+, but younger children can take part with help from an adult
This tutorial introduces you to the world of virtual reality and some of the basic concepts behind making virtual spaces.
Below you can find the instructions for this workshop, downloadable templates and a video walkthrough to guide you through the process.
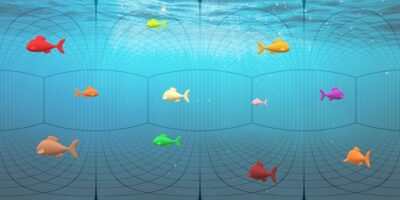
In this workshop we’ll be creating drawings like this:

which can then be viewed in 3D like this:

- Blank Room Template
- Alternative Template
- Example Drawings:
To start with, you’ll need to download the Blank Room Template from the link above. This template will look a bit weird – the lines are designed to give the illusion of being inside a 3D room. You’ll notice how they bulge at certain points and are closer together on the ‘walls’. But at the end of the process the lines will all become flat and equally spaced.
Now you’ve got two options – you can either print out the template and draw on it by hand, or edit it on a drawing programme on your computer.
If you want to make your drawing by hand:
- If you can, print the template. This will give you your guide for an effective 3D space.
- If you don’t have access to a printer, don’t worry. You can also make your own template without all the lines – just draw out a box with a width that is twice that of the height – so you have a long rectangle. This won’t have quite the same 3D effect, but it will still work.
- Now you’ve got your template, you can draw over it in pencil, pen or crayon. Collaging also works really well. When you’re making you design, think about where things will end up in the 3D space – as a rough guide, large things drawn in the middle of the template will look like they are in the centre of the room, things at the top will appear on the ceiling and things at the bottom will be near the floor. Small drawings near in the middle and at the edges will look like they’re near the walls.
- When you’ve finished your drawing, you’ll need to scan or photograph your design, so you have a ‘jpeg’ image file of it. You’ll need to make sure the image is cropped very close to the edges as any border will mess with the 3D effect. If you’re not sure how to do this ask an adult to help.
- Now go to the ‘making your drawing 3D’ section
If you want to design your drawing using a computer:
- Download the template and open it up in an image editor you like to use. This could be Microsoft Paint or Photoshop. If you don’t have anything installed you can use an online app. Sketch.io is good and free to use, https://sketch.io/ (This is what we’ve used in the example video.)
- Using the same basic rules as above, draw your design onto the template. Make sure the software doesn’t add a border around the template, as this will mess with the image. Once you’re happy with your drawing, save it as a jpeg file.
Making your drawing 3D:
Now you have your finished image, you can visit https://360toolkit.co/preview-panorama-viewer to turn your drawing into a 3D space.
Click on the button that says: Please select an image file to begin.
This will ask you to load your image. Find where you’ve saved it and click on it to upload.
As soon as you’ve uploaded it you will then see the image appear as a 3D space. You can look around it in 360° by clicking and dragging with the mouse pointer.
Tips:
-The first template helps give a convincing 3D room effect, which can make it easier to design things that look like they are on the wall of a room.
-If you feel confident and want to try drawing 3D shapes, this might be easier with the second template.
-At first you might want to do a very quick drawing to see how it changes when you view it in 3D. You could try drawing a square and circle in different places and see how they change.
-If you want to share these scenes with friends you can use Flickr or Google Virtual Tour Creator. You’ll need an adult to help you with this as these platforms need you to sign in to an account.
What we’ve been doing here is creating spherical panoramas. The grid that we use to plan our drawing is called an equirectangular gird. It’s the same thing that is often used to create maps of the world. However, when we view the map of the world, that is like viewing the outside of the sphere. What happens in our workshop is that we see the inside of the sphere.
The templates provided were created by D.M. Swart and Ret Samys. You can find out more examples of 3D drawing on their websites here, https://dmswart.com/2016/06/28/drawing-a-panorama/ and https://www.youtube.com/watch?v=1pQW61ixdME
For a really in depth look at the maths behind this method of drawing, visit this website showing the research of Antonio Araujo http://www.univ-ab.pt/~aaraujo/equirectangular.html